Blog

Sad Truths About Project Rescues

This tweet got me thinking about the many project turn arounds I have seen over the last 20 so years. We’ve all seen the scenario play out time and again. The business pushes for more scope, faster delivery, and lower budgets. The project teams (I’ve seen this with both creative and IT teams) feel tremendous pressure to acquiesce to these demands. Even if the project manager makes a valiant defense of a rationale budget, scope, and timeline eventually they get worn down or overridden by their management and the inevitable happens. Management is promised a project the team knows in their hearts to be unrealistic, and everyone begins slogging away, hoping for a miracle, hoping for some break. Maybe some key elements on the critical path will come in early. Maybe the clients/sponsors will sign off on key deliverables within the planned 2 reviews. Almost never happens. If this is an IT project the odds are even lower, due to the vicious cycle of late and over budget projects which convince business sponsors that they need to dictate tighter budget and timeline constraints, knowing they will be missed, which in fact causes more projects to fall behind if not fail.

Then you have a project in Trouble. A project that is Red. And often, at least in the organizations I’ve worked with, people are brought in to to turn things around. I have had several of these put on my plate over the years, and the formula for success is usually very straight forward: tell the truth around what it is going to take to get the project done, or how much scope needs to come out to hit the time/budget. Yes, there are plenty of other things to do like look at the team structure, review and question the scope, re-vitalize the team, rebuild business confidence, look for efficiencies, etc. But for some reason that must be deeply connected to the human condition, when you first come on to turn something around, people are able to listen to reason. Even when what I am saying and calling for is exactly what the previous manager said, it was only once the project was in real jeopardy that the team was listened to.

And that last bit is exactly what I have found to be the key to success in turn-arounds. Listen to the team. Actually sit down with them, as many one on one as possible, and get them to open up about the project, what’s working, what is not, where they see the risk. For more thoughts on taking on a project in flight, see my previous post on the topic.

As for avoiding the situation, I would love to hear what others have found to be successful. And I would love to hear more pithy quips like the one that got this post started.

Arduino 8×8 LED Matrix Multiframe Display

This project is an 8×8 LED Matrix bitmap driven display. One day while shopping on Adafruit for parts for a different project, I became fascinated with LED Matrixes they have for sale, and had a number of ideas for projects including a one letter at a time ticker-tape, and this project which is inspired by the old-fashion flip books like ones I would make in the corner of my notebooks when bored in class. I liked the notion of the challenge of having to design graphics that could only be represented in an 8×8 display. There’s something nostalgic about it. At any rate I hope you enjoy making this, and would love to see what bitmaps you come up with if you feel like sharing them.

What you’ll need for this project:

  • Arduino Uno
  • Medium breadboard
  • 8×8 LED Matrix (I used this one from Adafruit, but did not solder on the backpack yet)
  • Potentiometer (I used a 10k)
  • 8 1k Ω resistors
  • 18 jumper wires
  • 8 small pieces of hookup wire, trimmed (or additional jumper wire if you prefer)

I faced two main problems in getting this project to work. The first was figuring out which PINs lit up which rows and columns on the matrix. It turns out I couldn’t find a “standard” pin-out diagram, but I noticed from the picture on Adafruit for the part only half the pins on each side had a resistor, so that’s how I wired mine up. From there I went through the process of powering the matrix pin by pin to figure out the set up.

Once you have it wired up, it should look something like this:
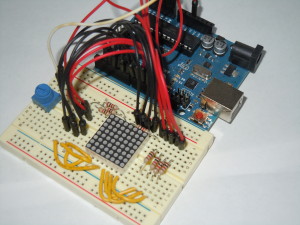
Finished 8x8 LED Matrix Wiring

I am using A0 for the pot input (you will also need to connect it to a GND and 5v), and A1 to A5 correspond to digital output 15 to 19 (the Arduino analog pins can also be used as addition digital pull up resistors.) The wire diagramming tool I use didn’t have the graphic for the LED matrix, so I mapped the Arduino pins to the matrix below. The ones with an “R” need to have a resistor between the Arduino pin and the matrix pin.

8x8MAP

You can test your wiring with this simple sketch that will light up one LED at a time, then progress column by column row by row. If the LEDs are not lighting up in order, then change the order in columnPins and rowPins until they do.

const int columnPins[] = { 6, 7, 8, 9, 2, 3, 4, 5 };
const int rowPins[] = { 15, 12, 11, 10, 19, 18, 17, 16 };
int row;
int col;

void setup() {

  for (int i=0; i<8; i++) {

    // set each pin to output
    pinMode(columnPins[i], OUTPUT);
    pinMode(rowPins[i], OUTPUT);

    //ensure each LED is off
    digitalWrite(columnPins[i], HIGH);
    digitalWrite(rowPins[i], LOW);

  }  
}

void loop() {

  for (row = 0; row < 8; row ++) {
    digitalWrite(rowPins[row], HIGH);
    for (col = 0; col < 8; col++) {
      digitalWrite(columnPins[col], LOW);
      delay(100);
      digitalWrite(columnPins[col], HIGH);
    }
    digitalWrite(rowPins[row], LOW);
  }
}

The second issue was the time it takes, and the likelihood of making a mistake, in designing bitmaps by hand in the Ardunio sketch, 0 by 1. Especially since my goal was to make multi-frame movies. My solution to this was to develop a Processing program that would allow me to visually design each frame and save it to a file, which is described in a separate post.

Finally, load the following code into your Arduino sketch, upload to your Arduino board, and be sure to add your own set of bit maps (though you can use the one below in the code of course). This code can also be found on github along with a few example bitmaps.

/*
 * LED Matrix Bitmap Display v2
 *
 * by: Keith Kay
 * 11/27/2013
 * CC by-sa v3.0 - http://creativecommons.org/licenses/by-sa/3.0/
 * https://keithkay.com
 *
 * This sketch displays a bitmap or series of bitmaps on a 8x8 LED matrix, and implements the following
 * functionality:
 * - supports a variable number of frames as defined by the constant "frames"
 * - use of a potentiometer to control the frame rate
 *
 * Portions of this code from:
 *
 * “Arduino Cookbook, Second Edition"
 * by Michael Margolis with Nick Weldin (O’Reilly). Copyright 2012 Michael Margolis, Nick Weldin,
 * 978-1-4493-1387-6
 *
 */

// Note that if you are using Keith's "Processing Bitmap Generator for Adruino" you need to move the "frames"
// declaration up before the array, as it will be the last thing written to your bitmap file.

// <-- Copy and paste your bitmap array beginning here, or you can write it from scratch -->>

const int frames = 16; // Constant defining the number of frames

byte imgFrame[frames][8] = {
{   B11111111,B10011001,B10011001,B11111111,B11100111,B11000011,B11011011,B11111111}, // Each row here represents one frame
{   B11111111,B10011001,B10011001,B11111111,B11100111,B11000011,B11011011,B11111111},
{   B11111111,B11111111,B10011001,B11111111,B11100111,B11000011,B11011011,B11111111},
{   B11111111,B11111111,B11111111,B11111111,B11100111,B11000011,B11011011,B11111111},
{   B11111111,B11111111,B10011001,B11111111,B11100111,B11000011,B11011011,B11111111},
{   B11111111,B10011001,B10011001,B11111111,B11100111,B11000011,B11011011,B11111111},
{   B11111111,B10011001,B10011001,B11111111,B11011011,B11011011,B11000011,B11111111},
};

// <-- End copy and paste. Make sure you overright the array already here -->>

// define the constants used for sensor / emitter pins
const int columnPins[] = { 6, 7, 8, 9, 2, 3, 4, 5 };      // array holding the pin numbers of the rows
const int rowPins[] = { 15, 12, 11, 10, 19, 18, 17, 16 }; // array holding the pin numbers of the columns
const int potPin = A0; // potentiometer 

// define variables used for readings and programatic control
int row;
int col;
int potVal;
int frameDelay = 0;
int currentFrame=0;

void setup() {

  for (int i=0; i<8; i++) {

    // set each pin to output
    pinMode(columnPins[i], OUTPUT);
    pinMode(rowPins[i], OUTPUT);

    //ensure each LED is off
    digitalWrite(columnPins[i], HIGH);
    digitalWrite(rowPins[i], LOW);

  }  
}

void loop() {

  potVal = analogRead(potPin);    // read the voltage on the pot
  frameDelay = map(potVal, 0, 1052, 1000, 50); 

  if (currentFrame < frames) {
    show(imgFrame[currentFrame++], frameDelay);
  } else {
    currentFrame = 0;
  }
}

void show( byte * image, unsigned long duration) {

  unsigned long start = millis();        // begin timing the animation
  while (start + duration > millis())    // loop until the duration is reached
  {
    for (row = 0; row < 8; row++ )
    {
      digitalWrite(rowPins[row], HIGH);  // connect a whole row to +5v
      for (col = 0; col < 8; col++)
      {
        boolean pixel = bitRead(image[row], 7-col);
        if (pixel == 1)
        {
          digitalWrite(columnPins[col], LOW);  // connect column to grnd
        }
        delayMicroseconds(300);    //small delay for each LED
        digitalWrite(columnPins[col], HIGH);  // disconnect column from grnd
      }
      digitalWrite(rowPins[row], LOW);  // disconnect a whole row
    }
  }
}

When it’s finished you should be able to load different bitmaps and display them, as these examples show.


Processing Bitmap Generator for Adruino

bitmap_gen1A while back, I had purchased an 8X8 LED Matrix from adafruit, and while it comes with a multiplexer you solder on, before I took the easy route I wanted to wire it up the hard way so I would understand how it worked. And while there are plenty of tutorials and examples for Arduino out there, they presume you have a bitmap ready. And that is fine in terms of getting the matrix working, but in terms of getting it do something interesting, that would require a series or array of bitmaps, and rather than trying to sit down and write out a series of 0s and 1s in a text editor, I decided to make an editor in Processing which would do that work for me.

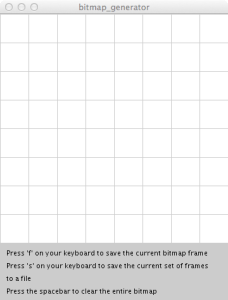
When run, the Processing code will display an 8X8 grid (shown right), each square of which is clickable. You can either save a frame, then clear the screen and draw the next frame, or save all the frames currently in memory to a file. As the code is currently written, each time a frame is saved to memory, a JPG file is also written to the [project folder]/bitmaps directory for testing purposes. This can be removed by commenting out this line of code:

saveFrame("bitmaps/bitmap-####.jpg");

For example, if we create two frames that look like the images below:
happy_creepercreeper

The resultant file saves the bitmaps as an array called imgFrame, where each row in the array represents one frame. Note that in the code all the “rows” of a frame will be on one line to take less space, I have inserted a return here so you can visualize the creepers:

byte imgFrame[frames][8] = {
  B11111111,
  B10011001,
  B10011001,
  B11111111,
  B11100111,
  B11000011,
  B11011011,
  B11111111},
{
  B11111111,
  B10011001,
  B10011001,
  B11111111,
  B11011011,
  B11011011,
  B11100111,
  B11111111};

const int frames = 2;

The last line of the file declares a constant that defines the number of frames for use in your Arduino sketch that makes use of the bitmap. You will need to paste both the bitmaps and constant declaration into your Arduino sketch to make it work.

You can copy the code for this project, or you can download it from github and there are also a few example bitmaps in the bitmaps folder.

/*
 * Bitmap generator for an 8x8 LED matrix
 * by Keith Kay
 * 7/6/2013
 * CC by-sa v3.0 - http://creativecommons.org/licenses/by-sa/3.0/
 * https://keithkay.com
 *
 * portions of this code modified from:
 * Two-Dimensional Arrays - Example: 2D Array of Objects
 * http://processing.org/learning/2darray/
 *
 */

/* Declare our variables */
Cell[][] bitmap;          // 2-dimensonal array used to store the bitmap
PrintWriter bitmapOutput; // declare an instance of PrinterWriter, a processing class that allows characters to print to a text-output stream.
int bitmapOutputCount=0;  // variable to store the count of the number of bitmaps saved as a file
int imgFrameCount=0;      // variable to store the numbers of frames in the current file
String filename="";       // variable to store the filename used to save all the bitmap frames

int cols = 8;  // used as a constant
int rows = 8;  // used as a constant

void setup() {

  // build the grid used to represent each "pixel" of the bitmap
  size(360,450);
  bitmap = new Cell[rows][cols];

  // iterate thru each cell and initialize it, passing sizing information, in this case 45x45
  for (int i = 0; i < rows; i++) {
    for (int j = 0; j < cols; j++) {
      bitmap[i][j] = new Cell(i*45,j*45,45,45);
    }
  }

  // finish drawing the window, including directions
  background(204);
  textSize(11);
  textAlign(LEFT);
  fill(0);
  text("Press 'f' on your keyboard to save the current bitmap frame", 10, 380);
  text("Press 's' on your keyboard to save the current set of frames", 10, 400);
  text("to a file", 10, 420);
  text("Press the spacebar to clear the entire bitmap", 10, 440);

  // open the file for the bitmap
  openFile();

}

// draw() is the main function in Processing, like loop() in an Arduino sketch
void draw() {
  drawBitMap();  
}

void drawBitMap() {
  // The counter variables i and j are also the column and row numbers and 
  // are used as arguments to the constructor for each object in the grid.  
  for (int i = 0; i < rows; i++) {
    for (int j = 0; j < cols; j++) {
      bitmap[i][j].display();
    }
  }
}

// using the mouseClicked() event instead of mousePressed, because it was too erratic
void mouseClicked() {
  for (int i = 0; i < rows; i++) {
    for (int j = 0; j < cols; j++) {
      int temp = bitmap[i][j].clickedOnMe();
        // we can drop out as soon as we get a match because only one cell can be clicked at a time
        if (temp == 1) break;     
    }
  }
}

// keyReleased detects when a key has been pressed and released, this was found to be more reliable
// for getting one execution of this function than keyPressed
void keyReleased() {
  // f - save the current frame
  if ((key =='f') || (key == 'F')) {
    // export the bitmap to a file
    saveFrame("bitmaps/bitmap-####.jpg"); // these are going to be saved in the project folder of your Processing folder

    // write the header line and then traverse the array to write the bits for an entire "frame"
    imgFrameCount++;
    bitmapOutput.print("{ ");
    for (int i = 0; i < rows; i++) {
      bitmapOutput.print("  B");
      for (int j = 0; j < cols; j++) {
        bitmapOutput.print(bitmap[i][j].cell_set);
      }
      if (i < rows-1) {
        bitmapOutput.print(", ");
      } else {
        bitmapOutput.println("},");
      }
    }
  }

  if ((key =='s') || (key == 'S')) {

    bitmapOutput.println("};"); 
    bitmapOutput.println("");

    // print the number of frames
    bitmapOutput.println("const int frames = " + imgFrameCount +";");

    // close the current file and open the next
    bitmapOutput.flush();
    bitmapOutput.close();
    imgFrameCount=0;
    openFile();
  }

  // simply clear the grid
  if (key == ' ') {
    for (int i = 0; i < rows; i++) {
      for (int j = 0; j < cols; j++) {
        bitmap[i][j].clear();
        bitmap[i][j].display();
      }
    }    
  }
}

void openFile() {

  bitmapOutputCount++;
  filename = "bitmaps/bitmap_" + bitmapOutputCount + ".txt";
  println("Opening output file : " + filename);
  bitmapOutput = createWriter(filename);    
  bitmapOutput.println("byte imgFrame[frames][8] = {");
}

// A Cell object
class Cell {
  // A cell object knows about its location in the grid as well as its size with the variables x,y,w,h.
  float x,y;   // x,y location
  float w,h;   // width and height
  byte cell_set;

  // Cell Constructor
  Cell(float tempY, float tempX, float tempW, float tempH) {
    x = tempX;
    y = tempY;
    w = tempW;
    h = tempH;
    cell_set = 0;
  }

  void clear() {
    cell_set = 0;
  }

  int clickedOnMe() {
    if ((mouseX > x) && (mouseX < x+w) && (mouseY > y) && (mouseY < y+h)) {
      // we need to flip the current setting of cell_set
      if (cell_set == 1) {
        cell_set = 0;
      } else {
        cell_set = 1;
      }
      return 1;
    } else {
      return 0; 
    }  
  }

  void display() {
    stroke(204);

    // determine fill color
    if (cell_set == 1) {
      fill(0);
    } else {
      fill(255);
    }

    rect(x,y,w,h); 
  }
}


Ideas for further improvement:

  • Add a preview feature that allows you to see the animation of the frames as you are building them.
  • Move the constant declaration to the top of the file, since you need to declare it before you can use it in your Arduino sketch. Right now, I just move it manually, as it still saves a great deal of time versus creating bitmaps by hand. Right now this happend because the filestream if written to each time “F” is pressed there is no way to know when the file is opened how many frames there are. If we were to store each frame in an array (necessitating an “array of arrays”) that could be used to address this bullet and the one above.
  • Store the frames in such a way that an Arduino sketch could read directly from the file, eliminating the need to update the Arduino sketch each time.

Military Career Management and Veterans Employment

According to a Bureau of Labor Statistics report from March, 2012 there were 21.2 million Veterans in the US, and of those 2.6 million are Veterans of post-9/11 operations.

One of the things that has proven to be a significant obstacle for many Veterans is translating their military skills into civilian skills. No one in the civilian world cares about your duty assignments and awards. You have to translate the awards/medals into what result your drove that led to the medal. Whether it was a reduction in deadline vehicles in motorpool or an increase in report production in the SCIF, focus on the tangible results you drove, and the responsibilities you took on, especially all the “extra” responsibilities we all take on aside from our primary MOS.

I have seen some US Military members maintain LinkedIn profiles, and that is certainly a good idea. Not really as a place to track your military career, but definitely as a way to begin to build your network that will proven powerful in the future.

A recent entry in the professional social network scene is RallyPoint, and if you are currently serving it is well worth taking a look.

5 Rules for Managing Project Scope

It is often said that Project Management is not complicated, it is the disciplined application of basic project block and tackling, using simple well defined processes and artifacts. Of course that doesn’t make it easy, and many organizations struggle with delivering projects, let alone actively developing their project management discipline.

With that in mind, I am going to pick up on the theme of a previous post and work on a series of “5 rules” posts regarding project management topics. Each of these topics could each have a book written about them, and in fact there are many, many books on each of these subjects. My goal is simply to contribute some practical knowledge based on lessons learned over the years I have been delivering projects for clients. These projects have mostly involved technology of some type, but these haven’t all been “IT” projects, in fact many have been user experience design projects as well, and are just as applicable for agency account and project management types as it is for IT PMs.

Today’s post regards scope management. Poor scope management has to be one of the biggest, if not the biggest, contributors to project failure and budget and timeline overruns. It is the source of endless stress for PMs, and frustration for business sponsors/product owners. There are many factors that drive “scope creep“, and we can have a long discussion about the deep-seated mistrust within organizations that leads to unrealistic scope for schedule and budget – whether IT is padding their estimates, or whether business owners are unrealistic in their expectations, or dictate timelines without any basis of reality. However that discussion has no conclusion, and really depends on where you sit within the organization. My goal here is simple to give you as a PM, or possibly an Account type, some tools you can use in your daily project life to keep sanity.

As you think about the 5 points below, keep in mind they apply to four distinct elements of scope management:

  1. Product Scope – this is what the product needs to do, typically thought of as the feature set, or product roadmap. In agile terminology this is the collection of your epics, and to some degree the entirety of the User Stories in your backlog though it will never all be fully built. This is the long term vision of the project so it is never absent, just often poorly done.
  2. Release Scope – simply, this is the collection of Product Scope (features, user stories) selected for inclusion in your current project. Sometimes also called a Product Increment.
  3. Project Scope – this is work that needs to be accomplished to deliver the Release Scope to the performance characteristics defined by the product owner. Think of things like project management, team meetings, performance testing, etc. Really any activity the team needs to participate in that will affect your schedule. This is really only missed by inexperienced PMs, or people just pretending to be PMs.
  4. Scope Management Processes – this I find often gets missed, the very processes and meetings required to manage scope are in a way scope themselves, and each of the 5 rules below need to be applied to this category too.

1 – Write it down

This seems simple enough, but I am always amazed in reality how much scope gets undocumented, or is documented in so many places as to not have an official “source of record.” If you have a product backlog, associated business requirements, associated functional specifications, wire frames, visual design comps, meeting minutes, change requests, etc. you have yourself a potentially massive traceability problem. As a team, you have to define and agree on one master record, then you need to have processes defined for change management to ensure that changes to scope are clearly documented, approved, and updated throughout the documentation.

2 – Walk the team through it

For some reason, PMs seem to believe if it has been written down and checked into some document repository, their job is done. It is certainly not. It is critical that at least the lead for each track or discipline involved walk thru the scope together and raise (and document) clarifying questions. Your main goal here as the PM, it not to “defend” your scope document, it is to drive ambiguity and risk out of your project. I have found the team is usually good at identifying potential vague scope that needs drilling into, and they are definitely good at identifying scope that has the potential to take away their weekends. Typical times to do this are at the project initiation, during a mid-design checkpoint, and again when transitioning from design into development.

3 – Discuss it with your client or business partner

Do not fall into the trap of thinking that just because the project scope has been “approved” that you and your client/product owner actually have a shared understanding of what the scope document actually means. It is critical to have a review, similar to step 2 above, but this time you will also review the issues and clarifications needed from the team, and capture and resolve any follow-up. I also continue to be amazed at how often, simply asking “what else”, “what other…”, “anything else…”, elicits a response when everyone nodded their heads that we were closed. Your job as the PM is not just to facilitate the process, but understand the product – this enables you to have the insight to probe on grey and potentially missing areas of scope. Do so.

4 – Manage it

They way I think about this there are two aspects to “manage it” rule. The first one is generally dealt with in PM literature, often called Change Management, and that is to manage the intake of new scope requirements (and occasionally the removal of scope items.) The process for this is mostly an extension of the processes you used to capture the original scope, modified to be repeated over the life of the project. You need to be able to intake potential scope changes, validate, estimate the impact of them, meet with your clients to decide if they are in or out, and re-baseline you management metrics based on the new set of scope. Typically everyone understands this and the process are well documented in various books, PMO charters, manuals, ad nauseum. What I’ve found repeatedly missing is the PM actively monitoring discussions, meetings and design documents for the addition of scope that has not been agreed to. My experience is that both technology and creative teams too often over-eagerly agree to “just a little stretch” of scope here, and a little there, and pretty soon you have an unrealistic set of client expectations. I call this Listening for Scope, and it is a critical PM skill to develop an ear for scope. The best PMs do it naturally because they are detail oriented by nature, and so do some of the best Account people, (although they are less likely to stop it in front of the client, but that another post). However anyone can develop this skill, it just requires that you immerse yourself in the product/solution your team is developing as well as review the documented scope on a regular basis.

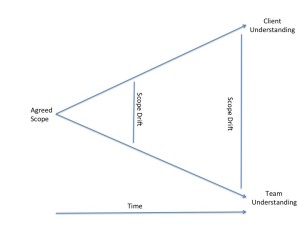
The second aspect of “Manage It” is managing what I call Scope Drift. This is the process by which the team and the client’s remembrance of what the documented and agreed upon scope actually means drifts apart, and if unmanaged can diverge significantly. If you have ever had a client say “Well, yes, I know we agreed on X, but I just thought that would also include Y” you may have unmanaged scope drift.

I have prepared a complicated diagram to illustrate this process:

As time passes, the shared understanding of scope drifts apart.

So what to do about it? You can’t really ask the team and the clients to meet regularly and review scope – “hey folks, I know this deliverable is closed, but I want to get together and review it again anyways, just to be sure.” That would go over well. My approach to this is implicit, and relies heavily on that ear for scope I mentioned above. You can, and should, have design reviews, tech reviews, deliverable reviews, wireframe walk-throughs, demos, user testing, acceptance testing, etc. and during all of these meetings you must asking probing questions to drive out any assumptions being made about what is happening that isn’t shown, what is happening behind the scenes, and reinforce to the client (and the team) how what was reviewed maps back to scope. You can use simple statements like, “And as we closed on during the project definition, the Account Management functionality we just walked through represents the full set of account management features for this release.”

You might be surprised the difference that one sentence could make:
Scenario 1 : Sentence is not used. The clients and the team are both happy with the walk thru and all the designs are approved. The team believes they are done with Account Management, but in their head the client has approved the Account Management functionality that your team has completed so far. There are so many more exciting things the client wants to do with Account Management, and they can’t wait to see the next revision. This scope drift isn’t realized until weeks later, and the team ends up working several weekends to implement a compromise version of what the client wanted. The client is unhappy, the team is burnt, you go over budget and deliver late.
Scenario 2 : Sentence is used. The issue having been detected is taken offline and discussed later that day, you the PM review the agreed upon scope with the client and they realize that they had not talked to you about their evolving vision for account management. You agree to document the new items in the backlog for future releases. The client thanks you for being so diligent, the team is relieved and impressed they finally have a PM that knows their shit, and all is right in the world.

So there you have it – manage scope and everything will go as planned. Well, not really but still you do need to manage scope diligently

5 – Verify it

It should go without saying that after you have done all this diligent work to carefully document and manage scope that you also need to ensure that your team actually develops to that same scope. Every experienced PM has heard statements from their team like “well I knew the client wanted it and I had time” or “well I thought this approach was better than what we agreed to.” Exasperating to be sure, and truly the actual execution and quality of whatever craft is involved is the domain of you Creative Director, or Technology Lead/Architect, but you as a PM have to ensure that the proper quality controls and verifications are integrated into your plan, and that you involve whatever QA discipline you have available within your organization. But that simply is not enough. As we have already discovered and agreed upon above, no one in your organization knows the scope of this project better than you, so you have to be in attendance at these reviews and checkpoints. Maybe not all, but enough for the team to know that you are on top of it and you will catch it. It is also a best practice to have periodic internal walk-throughs, if nothing else you must have one before a walk-through is done with the client. Your other domain leads can help here, and be up front that the internal walk through is to make sure that everyone is on the same page internally and there is no misleading or unintentional scope or expectations set by the intended walk-through or the voice over for the session.

A Final Word

To make all this work, the number one thing that you need to instill in yourself and your team is discipline. Discipline to follow the scope management processes you’ve defined. Discipline to gently and professionally refer the client to you, the PM, when new scope or a scope disagreement surfaces. Discipline to hold the team and client accountable to the scope agreed to. Discipline to force yourself to have that difficult conversation early rather than let it go and hope the team will get ahead somewhere else so you can “sneak it in.”

Yes, being a PM can be difficult and thankless, but you picked this profession, now you have only decide if you are man or woman enough to do what needs to be done.

For a thorough discussion on the subject see the PMIs Project Management Body of Knowledge (PMBOK), search Amazon.com for project management, agile management, product management, or the many excellent blogs and sites on Project Management, a few listed to the right.

Arduino self-calibrating laser trip wire

When I first started this project I figured there would be plenty of references on the web for how to put this together, so I went ahead an ordered a laser from Adafruit and didn’t give it much thought. However once I received and started to attempt to build one, I found myself unsatisfied with what’s out there. As these things usually happen, I started with an example from somewhere else, then as I tried to use it, ran into an issue, then went back and modified the circuit and the sketch to overcome that issue.

The first thing was to just to get it to go off when the laser beam is interrupted on its way to the sensor. The first issue I ran into was the need for an arming mechanism so I could align them first without setting them off. Then I ran into multiple problems with calibration of the sensor in different light and distance settings. I was surprised to find other projects were simply hard coding values into their sketch, which is fine if you just want to get it to working then move on to another project, but is problematic if you actually want the tripwire to work in different places and at different times.

So at any rate, over several iterations, and the addition of visual indicators to aid in the calibration process I finalized on the following design and code. If you find it useful, leave me a comment.

What you’ll need for the main detector and siren:

For the laser, you’ll need:

  • 1 small breadboard
  • 1 laser (I used a small 5mW 650nm Red laser from Adafruit)
  • 1 small switch
  • 1 9v battery
  • 1 9v battery clip

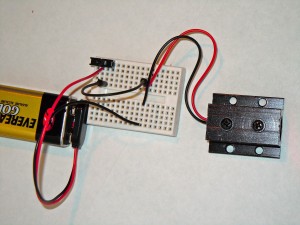
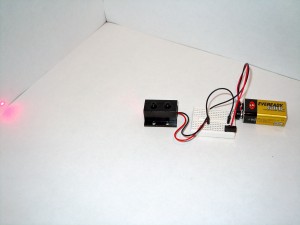
First wire up your laser to a small switch and 9v battery, as pictured below:

Laser with switch Laser with switch

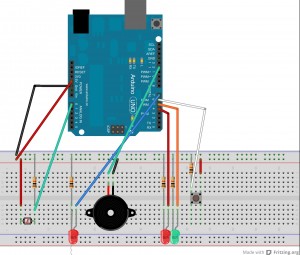
Next wire up the detector, indicator lights and siren according to the diagram below:

This image was made with Fritzing 0.7.11

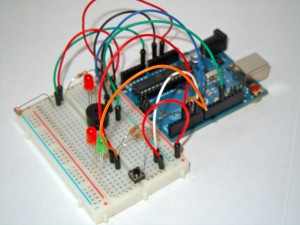
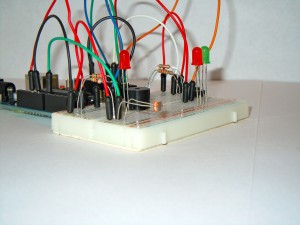
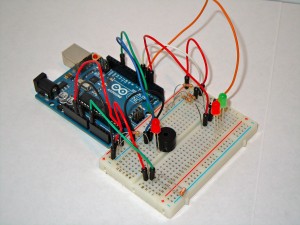
When finished it should look something like this:

Finished laser trip wire Finished laser trip wire Finished laser trip wire

Finally, load the following code into your Arduino sketch, upload to your Arduino board, tweak if you need to and test. This code can also be found on github.

/*
 * Laser trip wire
 * v 1.3
 * by: Keith Kay
 * 1/31/2013
 * CC by-sa v3.0 - http://creativecommons.org/licenses/by-sa/3.0/
 * https://keithkay.com
 * 
 * Laser trip-wire sketch which implements the following functionality: 
 * - Calibration to current light environment
 * - Visual feedback on alignment
 * - Arming and disarming mechanism
 *
 * attribution: siren code modified from
 *   Annoying siren
 *   CC by-sa v3.0
 *   http://tronixstuff.wordpress.com
 * 
 */

// first define the constants used for sensor / emitter pins
const int triggeredLED = 7;  // pin for the warning light LED
const int RedLED = 3;        // pin for the 'armed' state indicator
const int GreenLED = 4;      // pin for the 'un-armed' state indicator
const int inputPin = A0;     // pin for analog input
const int speakerPin = 12;   // pin for the speaker output
const int armButton = 6;     // pin for the arming button

// define variables used for readings and programatic control
boolean isArmed = true;      // variable for the armed state
boolean isTriggered = false; // has the wire been tripped
int buttonVal = 0;           // variable to store button state and compare with previous
int prev_buttonVal = 0;      // variable to 'debounce' button
int reading = 0;             // variable to store the analog value coming from the sensor
int threshold = 0;           // variable set by the calibration process

// constants used for the siren
const int lowrange = 2000;   // the lowest frequency value to use
const int highrange = 4000;  //  the highest...

void setup(){

  // configure LEDs for output
  pinMode(triggeredLED, OUTPUT);
  pinMode(RedLED, OUTPUT);
  pinMode(GreenLED, OUTPUT);

  //configure the button for input
  pinMode(armButton, INPUT);

  // for debugging and calibration review
  Serial.begin(9600);
  Serial.println("");
  Serial.println("Initializing...");

  // intial 'test' to be sure all LEDs and the speaker are working
  digitalWrite(triggeredLED, HIGH);
  delay(500);
  digitalWrite(triggeredLED, LOW);

  Serial.println("Unarmed");
  setArmedState();
  delay(500);

  Serial.println("Armed");
  setArmedState();
  delay(500);  

  // calibrate the laser light level in the current environment
  // this was moved to a function for future integration of a reset function
  calibrate();

  // start unarmed
  setArmedState();  

}

void loop(){

  // read the LDR sensor
  reading = analogRead(inputPin);

  // check to see if the button is pressed
  int buttonVal = digitalRead(armButton);
  if ((buttonVal == HIGH) && (prev_buttonVal == LOW)){
    setArmedState();
    delay(500);
    Serial.print("button val= ");
    Serial.println(buttonVal);
  }

  // print the value to serial
  Serial.print("Reading = ");
  Serial.println(reading);

  // check to see if the laser beam is interrupted based on the threshold
  if ((isArmed) && (reading < threshold)){
    isTriggered = true;}

  if (isTriggered){

    // siren code
    // increasing tone
    for (int i = lowrange; i <= highrange; i++)
    {
      tone (speakerPin, i, 250);
    }
    // decreasing tone
    for (int i = highrange; i >= lowrange; i--)
    {
      tone (speakerPin, i, 250);
    }

    // flash LED
    digitalWrite(triggeredLED, HIGH);
    delay(10);
    digitalWrite(triggeredLED, LOW);

  }

  // short delay - if you are debugging a modification you may want to increase this to slow down the serial readout
  delay(20);

}

// function to flip the armed state of the trip wire
void setArmedState(){

  if (isArmed){
    digitalWrite(GreenLED, HIGH);
    digitalWrite(RedLED, LOW);
    isTriggered = false;
    isArmed = false;
  } else {
    digitalWrite(GreenLED, LOW);
    digitalWrite(RedLED, HIGH);
    tone(speakerPin, 220, 125);
    delay(200);
    tone(speakerPin, 196, 250);
    isArmed = true;
  } 
}

void calibrate(){

  int sample = 0;              // array to hold the initial sample
  int baseline = 0;            // variable to set the baseline reading
  const int min_diff = 200;    // minimum difference needed between current light level and laser calibration
  const int sensitivity = 50;
  int success_count = 0;

  // ensure both LEDs are off
  digitalWrite(RedLED, LOW);
  digitalWrite(GreenLED, LOW);

  // start by taking a 10 reading sample, then take the average for our baseline
  for (int i=0; i<10; i++){
    sample += analogRead(inputPin); // take reading and add it to the sample
    digitalWrite(GreenLED, HIGH);
    delay (50); // delay to blink the LED and space readings
    digitalWrite(GreenLED, LOW);
    delay (50); // delay to blink the LED and space readings
  }

  // calculate and print the baseline
  baseline = sample / 10;
  Serial.print("baseline = ");
  Serial.println(baseline);  

  // now keep taking a reading until we've gotten 3 successful reads in a row
  do
  {
    sample = analogRead(inputPin);      // this time we work with one reading at a time

    if (sample > baseline + min_diff){
      success_count++;
      threshold += sample;

      digitalWrite(GreenLED, HIGH);
      delay (100);                     // delay to blink the LED and space readings
      digitalWrite(GreenLED, LOW);
      delay (100);                     // delay to blink the LED and space readings
    } else {
      success_count = 0;               // this give us the 'in a row' result
      threshold = 0;
    }

  } while (success_count < 3);

  //lastly we need to correctly set the threshold as it now hold the sum of 3 samples
  threshold = (threshold/3) - sensitivity;

  // play the arming tone and in reverse and print the threshold to condfrim threshold set
  tone(speakerPin, 196, 250);
  delay(200);
  tone(speakerPin, 220, 125);
  Serial.print("baseline = ");
  Serial.println(baseline);

}

For an overview of how this functions, I have included a video walkthru on youtube

At this point, this is as far as I am going to take this, but would love to hear ideas that build on this.


Blog Spammin’

Spam has as much value as this non-movie
Spam has as much entertainment value as this non-movie

One of the things that most entertains me is blog comments spam (okay not really), and as this is a newish blog, all of the comments I get are spam and scams. Obviously spam and scams aren’t the feedback I’m looking for and the Staff Sergeant in me wants to put a proper beat-down on these folks, but this is not ‘Nam. This is blogging. There are rules. So I will do what anyone else would do these days, vent into my own echo chamber which is my blog.

As I started my career as a developer one of the first things I do when learning a new language or platform is to create a “Hello World” program just to make sure I understand the mechanics, and that’s what I did here too, the Hello World post.

This acted like a spam magnet, to date with 30 comments, none real. I certainly experienced comment spam with blogger too, but not in this proportion. Then again this blog doesn’t have the same draw of highly topical content as my Grumpy properties. They seem to fall into 3 categories:

  • Blatant – these comments don’t waste time trying to trick you, and rely on the blogger who is too stupid or lazy to set up approvals on their blog comments and thus just get published. I’m not sure why spammers bother with this, as I would imagine the click thru rate must be something around zero. Maybe SEO or page rankings, that I don’t understand well enough to assess.
  • Flattering feedback – these folks have taken the time craft, and I mean craft, not write, comments generic enough to apply to a lot of post, especially knowing most blogs are personal in content or tone, they attempt to flatter you into approving it in the least or clicking it. Some favorites, remember these are in response to an initial “I have a blog” post:

    Excellent .. Amazing .. I will bookmark your blog

    An fascinating discussion is worth comment. I think which you will need to write alot more on this topic, it may well not be a taboo subject but frequently people aren’t sufficient to speak on such topics.

    This post is so help to me!

  • Something is wrong with your blog/website – these are clever enough not to bother with the fact that they aren’t reading the post and therefore the comment may not be on topic. The go right to the best marketing angle ever – fear. Great post, but I noticed there something wrong with you blog/site! You need to fix it right away. (Oh and I found this product you should check out that can fix it!)

The other common thing about spam comments is the entertaining misspellings and poor grammar, like you see in the Nigerian email scams.

So, bottom line – enable comments approvals and look into spam blockers for the platform you’re on, but also read them from time to time, you might just get a laugh.

Adding your Processing project to your website

Early in my exploration of Processing, I wanted to do a proof of concept on running a program from this website.

The Processing Development Environment includes a nice feature to Export your sketch (as Processing programs are called) to Windows, Mac OS, and Linux. If you are not running your own box, and like me are running your site on a linux hosting solution, then you don’t have the systems-admin type access to update your version of java, and deploy the files necessary. Or maybe you don’t have a sys-admin background, or maybe you just want an easier way to do it because you aren’t all that interested in that aspect of it and want to put your energies into the Processing program itself.

Unfortunately the search term “processing”, especially when paired with “website” tends to bring back a lot of payment solution providers. So I wanted to share the down and dirty version below, which I found after a few hours of search and experimentation. If you want an excellent and much more detailed discussion, vist pomax’s Processing on the web at nihongoresources.

Okay, so to get the point, how do we do this? The key is using Processing.js a sister project to Processing:

  1. Develop and test your Processing sketch, saving frequently.
  2. When you have got it “just right” go to Processing.js and download the latest “Production” release.
  3. Upload this file “processing-1.4.1.min.js” to a folder on your site that all your Processing projects can reference. For me it’s my “processing” folder, oddly enough.

    example processing folder
    example processing folder
  4. Upload your processing “.pde” file to your website as well. This can be in a same of different folder.
  5. Now you simply include a reference to both your sketch and the Processing.js file in your html, thusly:

    <!DOCTYPE html PUBLIC “-//W3C//DTD XHTML 1.0 Strict//EN” “http://www.w3.org/TR/xhtml1/DTD/xhtml1-strict.dtd”>
    <html xmlns=”http://www.w3.org/1999/xhtml” xml:lang=”en” lang=”en”>
    <head>
    <meta http-equiv=”Content-Type” content=”text/html; charset=utf-8″ />
    <title>Test Processing Page</title>
    <script type=”text/javascript” src=”processing-1.4.1.min.js”></script>
    </head>
    <body>
    <canvas id=”mysketch” data-processing-sources=”HelloProcessing2.pde”/></canvas>
    </body>
    </html>

    Note that the script tag should be somewhere in the <head> tag, and that both the script src element and the canvas data-processing-sources element need to include the relative path to the html file is you have chosen not to place them all in the same folder.

    <script type=”text/javascript” src=”[relative folder path]/processing-1.4.1.min.js”></script>
    </head>
    <body>
    <canvas id=”hellosketch” data-processing-sources=”[relative folder path]/HelloProcessing2.pde”/></canvas>
    </body>
    </html>

  6. Upload your html file and test. I have noticed that I have had to tweak my Processing sketches a little to get the same behavior our of Processing.js, for example I had to remove a
    delay(100);

    I had in for debouncing purposes, that was causing mousePressed not get picked up online.

  7. As noted above, it is generally good practice to include the <script> tag within the <head> tag, but it is not necessary. Here, I have simply included both in my WordPress page, on the “Text” tab, so you can see you can also do this without having to create your own WordPress templates, or html pages, etc. and just use the WordPress CMS.

    Example of processing.js inclusion in a WP page
    Example of processing.js inclusion in a WP page

5 Rules for Joining a Project Underway

Note: this is content migrated from a blog I no longer maintain “The Grumpy PM” and was originally posted on March 21, 2009

Okay, there’s really nothing simple about joining a project as the PM when the project is already underway. You’re going to need to jump right in and keep the project on track while you ramp up on everything about the project.

However, while you could probably write a small book or a long article on this topic, I have found that five is the magic number as far as the limit of “action items” or feedback points you can give someone and hope that they would retain it. Three is probably better, but I am hoping my readers are brighter than that. [;)

1 – Invest in Relationship Building
Take the time right up front to meet with all your team leads and key stakeholders one on one. Have an agenda going in, but try to keep the meeting informal and ask open ended questions to get people talking: ask each how they feel the project is going, what is working well, and what could be improved. You want to get several things out of this meeting – you need to quickly build rapport and find areas of common interest you can leverage to begin to build relationships with those you haven’t worked with before; you want to see what areas are highlighted for improvement, so you can direct attention to them; perhaps most importantly, you want to try to sense how people are feeling about the previous PM no longer being there, which is probably why you would be joining after the project started. While the urge will be great to bury yourself in the project charter, scope statement, WBS, and project schedule, resist, RESIST!

2 – Get the Up to Speed, ASAP
In direct juxtaposition to the above, you will need to ramp up quickly on the project, but don’t do it at the expense of rule 1 above. Ideally, you can get access to the project repository/library/whatever and gain an understanding of what the project is about, but if you have to do it after hours or on the weekend, it is an investment well made. I usually go for the project charter, scope documents, schedule, and risk register. You need to demonstrate competence and confidence to all the stakeholders you interact with in that first week or two, when everyone will be judging the new PM, and the team will be deciding if they are going to rally around you. As you review, make a list of questions you want to ask of team members and stakeholders as you meet with them.

3 – Trust the People on the Team
It may be the hardest thing to do sometimes, but you are going to have to trust the people already on the project to do the right thing. They have history on the team, they (should) know what they are doing, and you aren’t going to succeed without them. More than this though, you need to show them that you trust them, by word and deed. In relationship to point 2 above, tell the team that you don’t know everything, they are the project experts and you am going to rely on them. When an issue comes up or decision needs to be made facilitate the decision making process, but get the people with the project tribal-knowledge, so to speak, involved. Another thing that seems to work with most people is to ask them to explain aspects of the project they are the expert on.

4 – Do Something to Shake Things Up
I am not a psychologist, so I can’t put this in proper technical terms, however I have found a significant, positive mental burst of energy and motivation can be had from the team by make some changes right away. It can be how meetings are run, how reports are presented, or even something like changing around how people are physically seated. Go for some low hanging fruit that you know will benefit delivery or the project. Certainly, you will be approaching the project with a fresh set of eyes, and you should try to bring enthusiasm with you to the assignment. Share your observations and ideas with the team in an engaging and motivated fashion.

5 – Resist the urge to blame the other guy (or gal)
I can’t remember a single project where I have jumped in after it was started where people on the team didn’t blame issues on the previous project manager. Don’t be that guy, it’s shows a clear lack of accountability for the project you now are responsible for, and it is unprofessional. Be proactive and identify all the deliverables, action items, issues, etc. assigned to your predecessor and put them on your to-do list. Stay classy PMs!

Passing the PMP

Note: this is content migrated from a blog I no longer maintain “The Grumpy PM” and was originally posted on March 6, 2009.

I sat today for the PMP and am very pleased that I can report that I have passed it. So, what can I recommend for anyone else who may be planning to take the PMP? Here are a few suggestions, but bear in mind that these are coming from the perspective of an experienced project manager. If you are just out of school, these points may not be as relevant.

  • Have a study plan and stick to it. If you are a PM, you really shouldn’t need to be told this, this should be second nature.
  • Start with a good study guide. I recommend going to a book store and looking at several to see which format works best for you. Then check your local library to see if they have a copy. Save a tree and save some money.
  • Purchase a copy of the PMBOK Guide, or join the PMI since you get an electronic copy free.
  • Speaking of which, you should join the PMI anyways, since the cost of membership pays for itself if you are taking the PMP (Membership is $129, and the discount off the exam is $150 as of this post)
  • Supplement your reading with other learning activities that engage other senses. I used the PMP PrepCast, which I highly recommend, to listen to while driving and hiking, and I also took some CBTs on the areas I was having trouble with (for me that was QA and QC, which we don’t typically deal with as rigorously in IT as in other industries.) The CBTs I took were available thru online training provided by my employer, check with your HR, you might have a similar benefit you aren’t aware of.
  • I also made lots of flash cards, one set focused on the ITTOs for each process, and another set of terms, definitions, formulas, etc.
  • Let’s see, what else? Oh, take as many sample questions and exams as you can. This is an area where I could have done more preparation, but I have never been much for practice exams. However, the PMI has some peculiar ways of asking questions, and taking a lots of pratice exams or questions is a very good way to get an idea as much for how questions will be asked aswhat will be asked.
  • Review. Especially review those topics you studied first – this was an area I had trouble with. I did the worst with the Initiating Process Group, which surprised me because it is one of the most straight forward (I thought), but it was also the first Process Group I started with and so it had actually been a while since I had reviewed it.

I guess that is pretty much it. And that is probably the last I will blog on taking the PMP exam. I am gearing up to join a big eCommerce project, and need to quickly switch gears from the PMI view of the world to the Agile methodology that is being employed on this project. Anyone have good tips or ideas on agile project management, please leave a comment.