 A while back, I had purchased an 8X8 LED Matrix from adafruit, and while it comes with a multiplexer you solder on, before I took the easy route I wanted to wire it up the hard way so I would understand how it worked. And while there are plenty of tutorials and examples for Arduino out there, they presume you have a bitmap ready. And that is fine in terms of getting the matrix working, but in terms of getting it do something interesting, that would require a series or array of bitmaps, and rather than trying to sit down and write out a series of 0s and 1s in a text editor, I decided to make an editor in Processing which would do that work for me.
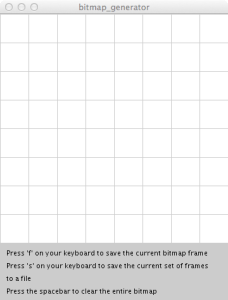
When run, the Processing code will display an 8X8 grid (shown right), each square of which is clickable. You can either save a frame, then clear the screen and draw the next frame, or save all the frames currently in memory to a file. As the code is currently written, each time a frame is saved to memory, a JPG file is also written to the [project folder]/bitmaps directory for testing purposes. This can be removed by commenting out this line of code:
saveFrame("bitmaps/bitmap-####.jpg");
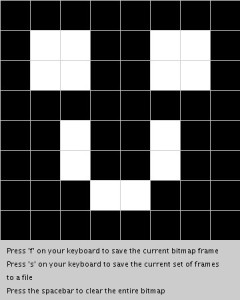
For example, if we create two frames that look like the images below:


The resultant file saves the bitmaps as an array called imgFrame, where each row in the array represents one frame. Note that in the code all the “rows” of a frame will be on one line to take less space, I have inserted a return here so you can visualize the creepers:
byte imgFrame[frames][8] = {
  B11111111,
  B10011001,
  B10011001,
  B11111111,
  B11100111,
  B11000011,
  B11011011,
  B11111111},
{
  B11111111,
  B10011001,
  B10011001,
  B11111111,
  B11011011,
  B11011011,
  B11100111,
  B11111111};

const int frames = 2;
The last line of the file declares a constant that defines the number of frames for use in your Arduino sketch that makes use of the bitmap. You will need to paste both the bitmaps and constant declaration into your Arduino sketch to make it work.
You can copy the code for this project, or you can download it from github and there are also a few example bitmaps in the bitmaps folder.
/*
 * Bitmap generator for an 8x8 LED matrix
 * by Keith Kay
 * 7/6/2013
 * CC by-sa v3.0 - http://creativecommons.org/licenses/by-sa/3.0/
 * https://keithkay.com
 *
 * portions of this code modified from:
 * Two-Dimensional Arrays - Example: 2D Array of Objects
 * http://processing.org/learning/2darray/
 *
 */

/* Declare our variables */
Cell[][] bitmap;          // 2-dimensonal array used to store the bitmap
PrintWriter bitmapOutput; // declare an instance of PrinterWriter, a processing class that allows characters to print to a text-output stream.
int bitmapOutputCount=0;  // variable to store the count of the number of bitmaps saved as a file
int imgFrameCount=0;      // variable to store the numbers of frames in the current file
String filename="";       // variable to store the filename used to save all the bitmap frames

int cols = 8;  // used as a constant
int rows = 8;  // used as a constant

void setup() {

  // build the grid used to represent each "pixel" of the bitmap
  size(360,450);
  bitmap = new Cell[rows][cols];

  // iterate thru each cell and initialize it, passing sizing information, in this case 45x45
  for (int i = 0; i < rows; i++) {
    for (int j = 0; j < cols; j++) {
      bitmap[i][j] = new Cell(i*45,j*45,45,45);
    }
  }

  // finish drawing the window, including directions
  background(204);
  textSize(11);
  textAlign(LEFT);
  fill(0);
  text("Press 'f' on your keyboard to save the current bitmap frame", 10, 380);
  text("Press 's' on your keyboard to save the current set of frames", 10, 400);
  text("to a file", 10, 420);
  text("Press the spacebar to clear the entire bitmap", 10, 440);

  // open the file for the bitmap
  openFile();

}

// draw() is the main function in Processing, like loop() in an Arduino sketch
void draw() {
  drawBitMap();
}

void drawBitMap() {
  // The counter variables i and j are also the column and row numbers and
  // are used as arguments to the constructor for each object in the grid.
  for (int i = 0; i < rows; i++) {
    for (int j = 0; j < cols; j++) {
      bitmap[i][j].display();
    }
  }
}

// using the mouseClicked() event instead of mousePressed, because it was too erratic
void mouseClicked() {
  for (int i = 0; i < rows; i++) {
    for (int j = 0; j < cols; j++) {
      int temp = bitmap[i][j].clickedOnMe();
        // we can drop out as soon as we get a match because only one cell can be clicked at a time
        if (temp == 1) break;
    }
  }
}

// keyReleased detects when a key has been pressed and released, this was found to be more reliable
// for getting one execution of this function than keyPressed
void keyReleased() {
  // f - save the current frame
  if ((key =='f') || (key == 'F')) {
    // export the bitmap to a file
    saveFrame("bitmaps/bitmap-####.jpg"); // these are going to be saved in the project folder of your Processing folder

    // write the header line and then traverse the array to write the bits for an entire "frame"
    imgFrameCount++;
    bitmapOutput.print("{ ");
    for (int i = 0; i < rows; i++) {
      bitmapOutput.print("  B");
      for (int j = 0; j < cols; j++) {
        bitmapOutput.print(bitmap[i][j].cell_set);
      }
      if (i < rows-1) {
        bitmapOutput.print(", ");
      } else {
        bitmapOutput.println("},");
      }
    }
  }

  if ((key =='s') || (key == 'S')) {

    bitmapOutput.println("};");
    bitmapOutput.println("");

    // print the number of frames
    bitmapOutput.println("const int frames = " + imgFrameCount +";");

    // close the current file and open the next
    bitmapOutput.flush();
    bitmapOutput.close();
    imgFrameCount=0;
    openFile();
  }

  // simply clear the grid
  if (key == ' ') {
    for (int i = 0; i < rows; i++) {
      for (int j = 0; j < cols; j++) {
        bitmap[i][j].clear();
        bitmap[i][j].display();
      }
    }
  }
}

void openFile() {

  bitmapOutputCount++;
  filename = "bitmaps/bitmap_" + bitmapOutputCount + ".txt";
  println("Opening output file : " + filename);
  bitmapOutput = createWriter(filename);
  bitmapOutput.println("byte imgFrame[frames][8] = {");
}

// A Cell object
class Cell {
  // A cell object knows about its location in the grid as well as its size with the variables x,y,w,h.
  float x,y;   // x,y location
  float w,h;   // width and height
  byte cell_set;

  // Cell Constructor
  Cell(float tempY, float tempX, float tempW, float tempH) {
    x = tempX;
    y = tempY;
    w = tempW;
    h = tempH;
    cell_set = 0;
  }

  void clear() {
    cell_set = 0;
  }

  int clickedOnMe() {
    if ((mouseX > x) && (mouseX < x+w) && (mouseY > y) && (mouseY < y+h)) {
      // we need to flip the current setting of cell_set
      if (cell_set == 1) {
        cell_set = 0;
      } else {
        cell_set = 1;
      }
      return 1;
    } else {
      return 0;
    }
  }

  void display() {
    stroke(204);

    // determine fill color
    if (cell_set == 1) {
      fill(0);
    } else {
      fill(255);
    }

    rect(x,y,w,h);
  }
}
Ideas for further improvement:
- Add a preview feature that allows you to see the animation of the frames as you are building them.
- Move the constant declaration to the top of the file, since you need to declare it before you can use it in your Arduino sketch. Right now, I just move it manually, as it still saves a great deal of time versus creating bitmaps by hand. Right now this happend because the filestream if written to each time “F” is pressed there is no way to know when the file is opened how many frames there are. If we were to store each frame in an array (necessitating an “array of arrays”) that could be used to address this bullet and the one above.
- Store the frames in such a way that an Arduino sketch could read directly from the file, eliminating the need to update the Arduino sketch each time.
Great tool. This is really handy 😀
I’m working with Processing to send “images” to the arduino in real time. Maybe with a little work I can incorporate your sketch in it.